I’m so excited about today’s post! I know I’m a day early but I couldn’t wait. A few things to help you understand where this is coming from…
I found The Great British Baking Show on Netflix!!! If you will remember from a previous post, I was obsessed with The Great American Baking Show and furious with myself that I never watched the original British version. Well, I have been binge watching. I seriously can’t get enough. All I want to do is bake. ALL. THE. TIME. Watching and listening to British people constantly makes me want to bake (and eat) traditional British treats.
And as a fellow blogger, Andrea from Cooking with a Wallflower, recently mentioned in her baked brie appetizer post… it is Springtime! The perfect time for bridal and baby showers, tea parties, and all kinds of lovely celebrations. My wheels started turning.
Tea Parties + British Baking = Scones

I really didn’t even have a choice; I had to make scones. And what a perfect addition to any springtime party menu. Now, scones are really quite simple to make. What I really wanted to have was real, fresh clotted cream to put on the scones.
Traditionally, scones are topped with clotted cream and jam. I did do a little research on how to apply the cream and jam- which comes first? It seems to be quite a debate. I can see the dilemma.
Clotted cream is like a mix between butter and whipped cream (but not sweet, to my mother’s dismay). I would always put butter on anything before I would put on jam. But, at the same time, I would always finish something off with a dollop of whipped cream. So, it really could go either way. Apparently it depends on where you are from. Here is what I discovered… If you are from Cornwall you put the jam on the scone first, then top with the cream. If you are from Devon/Devonshire, you put the cream on first, then top with jam.
I’m from St. Louis, Missouri and I put the cream on first. It seemed more natural to me.
It is SO EASY to make clotted cream. But, it does take a really long time to make it. Inactive time, but time just the same.
There are a couple of things to know when making clotted cream. You cannot use ultra-pasturized heavy whipping cream. You can use unpasteurized or pasteurized, just not ultra-pasteurized. This can actually be a little bit hard to find. I found it at Trader Joe’s.
Also, use a regular, small stainless steel pot with a lid. I followed this recipe from The Cupcake Project. The cream needs to come up 1-3 inches in the pot. My small saucepan and 1 pint of cream worked perfectly.
After you have baked in the oven (for 8-12 hours), cooled at room temperature (about 3 hours) and refrigerated (overnight)- you will scrape the clotted cream off the top and store it in the fridge. You will be left with regular cream underneath the clotted cream.


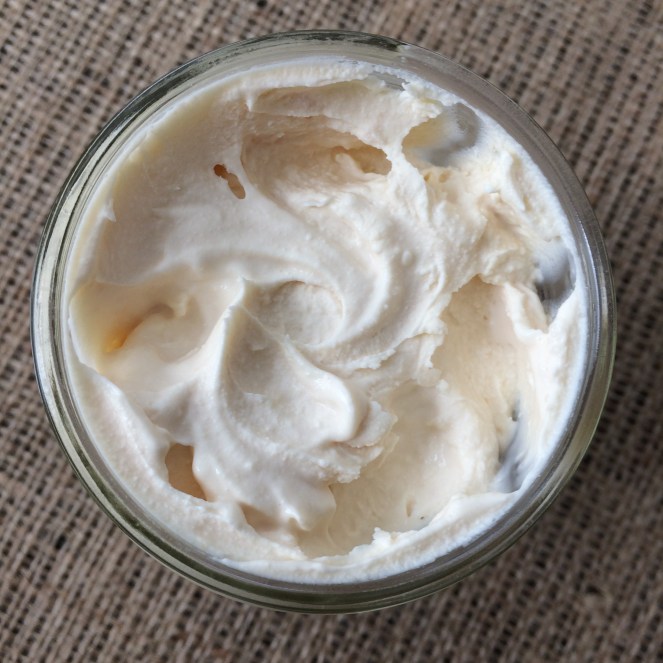
My clotted cream was very thick. 
I’m sure this is unorthodox but I mixed in a few tablespoons of the cream underneath into my clotted cream and stirred it with a chopstick. I think this gave me a better consistency.


As you can see in the picture below, I have a small mason jar of clotted cream on the right. On the left, I have a jar of the leftover cream- the cream that is underneath the clotted cream. That cream can still be used for coffee, baking, etc. I was left with a little over 1 cup of cream. Guess what you need to make scones… a little over a cup of cream. I love not having any waste!
I based my recipe for scones off of this one from Tyler Florence. He makes blueberry scones with a lemon glaze and cuts them in the classic triangle shape. I’m sure they are delicious. One day I will make flavorful, fruit-filled scones but not today. Today, I want plain scones because it’s really all about the clotted cream (and my homemade cherry jam). These scones are not sweet at all and I cut them in a round shape so it was easier to apply the cream and jam.
I sifted the dry ingredients together and then used a pastry blender to cut in the butter until the mixture looked kind of “sandy” like this
I’m sure you can use a food processor to cut in the butter but I don’t have one and I have always gotten along just fine without one. When you can squeeze the dough in your hand and it holds a little you have the right consistency.
Then add the cream, mix it together with a spatula a bit, dump it onto a floured surface and work with it just enough until it forms a dough. I use my hands to form it into a disk then a rolling pin to smooth it out and make sure it is an even thickness, about 1 inch. I use a juice glass to cut out the scones. Push straight down, don’t twist. You can do the same thing with a biscuit cutter if you have one.


Continue cutting and rolling the dough until you have used it all up; I made eight scones. Place them on a parchment-lined baking sheet. Brush the tops with a little cream then pop them in the oven.


*If you wanted to, you could sprinkle a little raw sugar on top of the scones after brushing with the cream, before baking in the oven. I didn’t want the sweetness; I was going to get all my sweetness from the jam.
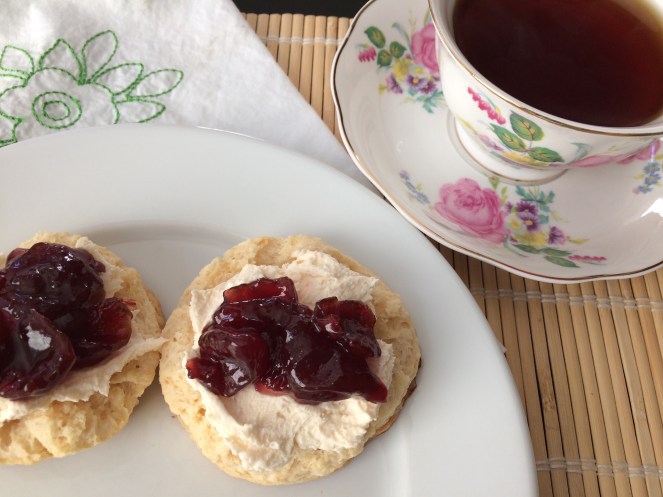
Then, I just pulled my beautiful scones apart with my fingers, topped with some fresh, rich clotted cream and jam. Serve with a cup of tea, amazing!


Let’s get to it, shall we!
Clotted Cream
Ingredient:
1 pint Heavy Whipping Cream (unpasteurized or pasteurized but not ultra pasteurized)
Preheat oven to 180 degrees.
Pour cream in a small oven safe pot with a lid. If it has rubber handles, just wrap aluminum foil around them.
Put covered pot of cream in the oven for 12 hours (you can do this overnight or by 7am in the morning if you won’t use your oven for the rest of the day).
After 12 hours, carefully remove the pot from the oven and let sit for a few hours to cool. Try not to jostle the pot too much.
After the pot has cooled to room temperature, place the covered pot in the fridge overnight.
The next morning, spoon the thick layer of cream off the top (this is the clotted cream) and put it in a small mason jar.
I mixed in a few tablespoons of the cream underneath as well and stirred it all together with a chopstick.
Put the jar in the fridge; it will last for about 5 days.
Rich, creamy and delicious!
Scones
Makes 8
Ingredients:
2 c Flour, plus extra for the board
1 T Baking Powder
½ tsp Salt
2 T Sugar
5 T cold Butter, diced
1 c Heavy Cream, plus extra for brushing
Preheat oven to 400
In a medium bowl, sift together the first 4 ingredients.
Cut in the cold butter using a pastry blender or two knives until the mixture resembles sand. If you squeeze some dough with your hands it should hold its shape a little.
After you have cut in the butter, pour in the cream.
Start bringing the dough together by mixing with a spatula and then switch to your hands.
*If you think your dough is a little too dry, add a little more cream
You want the dough to be well mixed but you don’t want to over work it.
Sprinkle some flour on your work surface (I use a Pastry Cloth) and form the dough into a circle about 1 inch thick. You can use just your hands or a rolling pin if necessary.
I use a juice glass to cut out my scones.
Put your glass or biscuit cutter into some flour and then push it straight down to cut out your scones (no twisting).
Place the cut out scones on a parchment-lined baking sheet.
Rework the dough until you get all the scones out of it you can (I got 8).
Brush the tops of the scones with a little bit of cream.
Place in the oven and bake until nice and brown (on top and bottom); about 16 minutes.
Let cool until comfortable to handle.
I could just pull these apart with my fingers and they split perfectly down the middle.
I first spread with clotted cream and then with jam.
Serve with a cup of tea and enjoy a little decadence.
Scones
A classic British teatime treat
- 2 c Flour (plus extra for the board)
- 1 T Baking Powder
- ½ tsp Salt
- 2 T Sugar
- 5 T cold Butter (diced)
- 1 c Heavy Cream (plus extra for brushing)
- Preheat oven to 400
-
In a medium bowl, sift together the first 4 ingredients. Cut in the cold butter using a pastry blender or two knives until the mixture resembles sand. If you squeeze some dough with your hands it should hold its shape a little. After you have cut in the butter, pour in the cream. Start bringing the dough together by mixing with a spatula and then switch to your hands. *If you think your dough is a little too dry, add a little more cream
- You want the dough to be well mixed but you don’t want to over work it.
-
Sprinkle some flour on your work surface and form the dough into a circle about 1 inch thick. You can use just your hands or a rolling pin if necessary.
-
I use a juice glass to cut out my scones. Put your glass or biscuit cutter into some flour and then push it straight down to cut out your scones (no twisting). Place the cut out scones on a parchment-lined baking sheet.
- Rework the dough until you get all the scones out of it you can (I got 8).
-
Brush the tops of the scones with a little bit of cream. Place in the oven and bake until nice and brown (on top and bottom); about 16-20 minutes.
Serve with a cup of tea and enjoy a little decadence.
Clotted Cream
The classic scone topping
- 1 pint Heavy Whipping Cream (unpasteurized or pasteurized but not ultra pasteurized)
- Preheat oven to 180 degrees.
-
Pour cream in a small oven safe pot with a lid. If it has rubber handles, just wrap aluminum foil around them. Put covered pot of cream in the oven for 12 hours (you can do this overnight or by 7am in the morning if you won’t use your oven for the rest of the day).
-
After 12 hours, carefully remove the pot from the oven and let sit for a few hours to cool. Try not to jostle the pot too much. After the pot has cooled to room temperature, place the covered pot in the fridge overnight.
-
The next morning, spoon the thick layer of cream off the top (this is the clotted cream) and put it in a small mason jar. I mixed in a few tablespoons of the cream underneath as well and stirred it all together with a chopstick.
- Put the jar in the fridge; it will last for about 5 days.
Rich, creamy and delicious!

I am already drooling!
LikeLike
They are so easy to make!
LikeLike
I love scones and love “your” scones. I have to be a bit of a snot here – I do prefer the typical triangle shape, just a bit of info for when you make for me. You are right too…I do love the Royals and everything about them. I have my fascinator ready for tomorrow. Love from your mom.
LikeLike