I love to read. A few years ago I read this book, The Baker’s Daughter by Sarah McCoy. I love to read fictional books about food and I also, apparently, love to read World War II fiction. I didn’t mean to love WWII fiction; it is just something that happened. Most of my all time favorite books happen to take place during that time period. If you want a list, let me know.
Anyway, The Baker’s Daughter is a wonderful book that takes place in Germany during WWII and big surprise – it is about a baker’s daughter. There are recipes in the back of the book and I couldn’t wait to make them, especially the cherry jam! The first time I made it, it was beautiful. Perfect. Amazing. And it has never worked the same since then. And I have tried A LOT of times. So frustrating.
The jam just never set properly again. It was always more runny. The cherries have always been delicious and useable. There has been no waste. I still use it as jam. Or, one time when the cherries were super runny I drained them and made a cherry pie. The recipe doesn’t use any pectin; it is just supposed to jam naturally. I couldn’t figure out what I did that first time that I clearly didn’t do any other time. But now, I have it figured out. What a relief!
After making this cherry jam I have tried other flavors successfully but the cherry is by far my favorite. It is also the biggest pain. Pitting cherries is a pain, no way around it. But the jam is sooooo worth it! Here is what I do and you should definitely give it a try:
I rinse and pit all the cherries and put them right into my pot. If the cherry starts to split while I am pitting it, I tear it in half and put it in the pot. I usually end up with about 3/4 whole cherries and 1/4 halved cherries.
Then, I pour the sugar over the cherries and let them sit for 2-4 hours. I stir it every so often just because I get great satisfaction out of seeing the sugar go from sugar to something of a cherry syrup.
After 2-4 hours have passed I zest a lemon into the pot, squeeze in a little bit of the juice and add a pat of butter. Then, turn the burner on and start stirring. You have to stir almost constantly because you don’t want the sugar to burn.
The mixture will eventually start to boil. You want to be very careful because it is very hot and it will burn you. Continue to stir and boil; the whole process will take almost 40 minutes.
At some point during the boiling, I have put a little plate in the freezer. When the jam is thick and beginning to coat the spoon it is nearing completion. Let some of the liquid drop off the spoon back into the pot. If it is still running off, keep cooking it. If it falls in thick droplets it is probably done.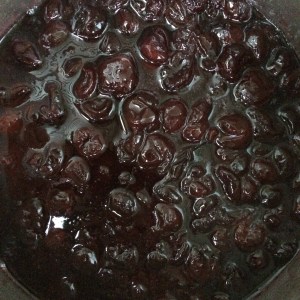
Get the plate out of the freezer and let some of the liquid drop onto the plate. Put the plate back in the freezer for about 2 ½ minutes. (*Turn off the burner at this point until you have checked your jam. There is no need to keep cooking it if it is done.) Take the plate out of the freezer and push your finger through the jam. If you can run your finger straight through it, turn the burner back on and keep cooking; check again in a few minutes.
If you push your finger through the jam and the jam wrinkles, it is done! Put in your clean/sterilized mason jars. I leave the mason jars in the hot water while filling them (*you don’t want to put hot jam in a cold jar or the glass could break).
Make sure the tops of the jars are clean and then put the lid on twisting as tight as you can. Flip the hot jars upside down for 5-7 minutes. Flip them right side up and eventually (could take an hour) you will hear the tops pop and you will know they are sealed. If the lids are loose do not tighten them, just leave them be! Store your jam in the pantry or give as gifts.


The jam will last basically forever. If you have any jars that did not seal correctly, just keep them in the fridge and use them within a few months. This jam is delicious on fresh baked bread, toast and scones!
There is something very satisfying about making jam. I really hope you give it a try, especially since all these beautiful cherries are starting to show up in the markets!
Cherry Jam
Fills Three ½ Pint Mason Jars
Ingredients:
2 lbs Cherries
2 c Sugar
Zest of 1 Lemon
1-2 tsp Lemon Juice
Pat of Butter (optional)
Rinse and pit the cherries and place them in a medium saucepan.
Pour in the sugar and give it a little stir.
Let sit for 2-4 hours.
Zest a lemon over the pot of cherries.
Squeeze in a little lemon juice and top with a pat of butter.
Turn the burner to medium-high to high and bring to a boil, while stirring.
Continue to stir while the cherries are at a rolling boil until the liquid is thickened and doesn’t run off the spoon but falls more in droplets (up to 40 minutes).
When the jam is done pour into sterilized mason jars, seal tightly and flip upside down.
Leave upside down for 5-7 minutes then turn right side up. Do not tighten lid again!
You will hear the lids “pop” when sealed.
Store in the pantry until opened, then store any remainder in the fridge.
Enjoy!
I love jam, preserves and jellies – this one is SO delicious!